Follow these simple steps to manage a native Wordpress Gallery in your website.
- Login to your Wordpress Dashboard, then return to the front of your website and browse to the page that contains the gallery you want to edit.
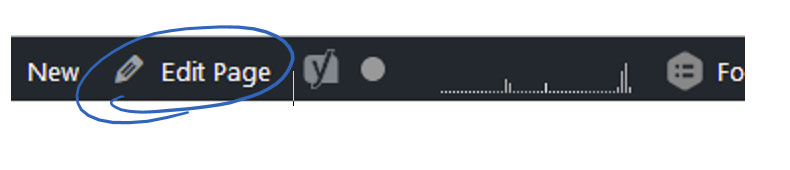
- Click on “Edit Page” in the Admin Bar at the top:
- Open up the Wordpress Gallery by clicking on the thumbnail images that are shown in the page once. A small icon will appear with an X and a pencil for editing. Click on the Pencil to edit the gallery:

- Once in the gallery you can:
a) Edit an image, by clicking on the image once and editing the details on the right hand side of the screen. These details will save automatically.
b) Add a new image to the gallery by dragging it onto the Gallery screen from your computer, wait until you see the background light up in BLUE and then drop it, the image will upload to the gallery from here.
c) Remove an image in the Gallery by clicking on the X in the top right of the image.
d) Reorder images by dragging and dropping them in the order you would like to see them.

- Once you’re happy with all the images in the gallery, click “Update Gallery” in the bottom right:
- Then click “Update” on the page in the top right to save the page:
- Browse back to the front page to double check your changes.
An important note on image sizes
You will quickly fill up your website space if you upload the raw camera image file straight to the website as these images are very high res and too large for the web (more than 1MB is too large). So please take note of these points:
- Resize your images before uploading them to the site. For the gallery they don’t need to be larger than 1000 pixels high and 1920 pixels wide. This is very large with room for growth.
- Always use JPG images for pictures with a lot of colour as this is a smaller file size rather PNG. Please never upload PNG files as gallery images as you will quickly run out of website space, JPG are a high quality with a smaller filesize.
If you’re not sure how to resize I will send you a link to ideas of what programs to use to do this, you should be able to use Paint or any other photo editing software on your PC.